Showing posts with label sowing and growing. Show all posts

Saturday, January 7, 2012

Magic Beans

If you are a returning visitor to Pocket Square Farm, you may remember that I hosted my 2nd annual Guerilla Dining experience in my backyard last August.

Yes, August. True, August is but a distant memory of balmy evenings spent lazily dining out back under the softly glowing lights. My yard now looks nothing like it did for this event [4 months ago]. Shrubs jut from the ground at sharp angles, victims of my recent pruning bonanza. Graceful tendrils and young grapevine shoots, which once wound themselves delicately along the strings of lights, now hang desperately, arthritic, callused, and crackly against the visible cords and wiring. Their leaves have dried and fallen and blown away. Beneath them, the lawn is less grass and more mud, soggy and dry at the same time. It's not a pretty sight.

So it doesn't seem right--in fact, it feels almost cruel--to speak now of summer dishes, of produce plucked right from the abundant beds and grilled or baked or steamed within hours (and feet) of their harvest. However, I really do feel compelled to share these recipes with you before I can continue down my blogging path, so here we go.

Let's start with the easiest dish I served at Guerilla Dining 2011: the beans.

These are not just any beans; they are magic beans.

No, that is not their scientific name. My children actually came up with this nickname for them. Their true name is Trionfo Violetto, an heirloom pole bean. This is an image of the seed packet I picked up at my local nursery just because the purple color caught my eye, and I wanted to give it a try. I have done several other varieties of green and yellow pole and bush beans in the past, but I am always interested in a little something new.

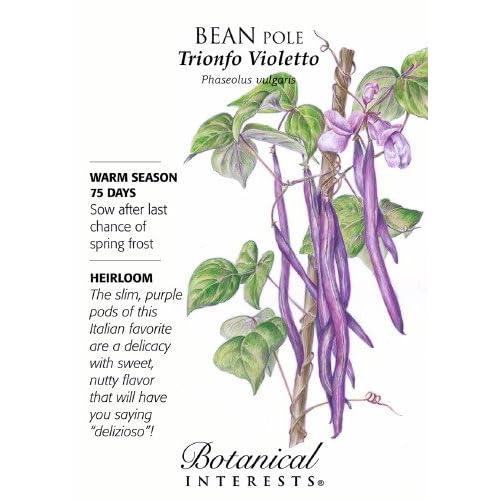
"Would they really be this purple?" I wondered.

Yep, they are!

Aren't these beautiful? I brought a bowl of the beans out to the dining table to show my guests before steaming them inside because (and herein lies the "magic" part) they actually change color when they are cooked. Yes, indeed. Apply just a little heat and these beans turn right back to boring old green, just like any other bean. Post-steaming, I returned the bowl of beans back to the guests to show them the difference, only to receive gasps and oohs and ahhs over the difference! Personally, I wish they would just stay purple. Isn't it so much prettier?

If you're looking to add a little more color to your veggie patch this spring, I would definitely recommend this variety. A few things to keep in mind, however.
  • First, runners on these beans are monstrous! I planted them around poles that were 8 feet tall, and they surpassed the tops and kept on running! I estimate they grew to about 15 feet in height altogether, so be sure you give them lots of vertical space for climbing.
  • Also, when these things start to produce, they are fast and furious. It seemed to me that the harvest was more of a one-shot deal over a couple of weeks, rather than some steadier producers like "Blue Lake" or "Kentucky Wonder." For best results (unless you're planning for a large dinner party) I would recommend succession planting over a period of about a month.
  • Sadly, these plants also seemed rather disease-prone (like so many heirlooms). Maybe it's just that I'm so near the ocean, but near the end of the harvest the plants became covered with a sticky, white substance (powdery mildew?) that made the beans inedible. I had to pull and toss the remaining plants. Be sure, if you try this variety, to place it in a warm, sunny locale that won't receive too much moisture.
  • Finally, if you want to enjoy the unique violet coloring, serve raw!
I will most likely plant these again this spring. I just can't resist that amethyst color. If you're like me, spending cold winter nights indoors dreaming of spring planting, you might want to add these to your 2012 garden plan!

Friday, August 26, 2011

Shelling Simplicity

"What did you do this summer?" This time of year, that seems to be the first question to roll off everyone's tongue. Just this afternoon, I spent a lovely day at the bay where I hosted a beach party reunion for my students from last year's class. And while I was there, visiting with students and parents alike, this question was asked and answered probably a hundred times.

In response, I rattled off the laundry list of activities my family did over the past few months. Vacations. Day trips. Projects around the house. Beach time. The usual, wonderful summer pastimes.

If someone had asked me what was my single favorite moment of summer, though, my reply would have been very different.

This was my single favorite moment of summer vacation:
The children and I sit on the driveway shelling beans.

I realize this may look like work. You may consider this kind of thing boring. But actually, it was very, very sweet. Shelling dried beans is one of my kids' very favorite garden tasks. They look forward to it every year. They sift through the dried plants hunting for the crackling pods, pluck them off the plants, and pinch them open. Shelling dried beans is like discovering buried treasure: perfectly smooth, round, beautiful garden doubloons. This year I planted both black and white beans for shelling.

Mason holds his breath as he opens a pod, waiting to see what color beans will be revealed inside.

Many different types of beans can be grown for drying and shelling. I happened to plant mostly black beans this year because I had a packet of seeds left over from last summer. The trick to a good harvest is patience. The beans will grow and develop as a typical bush or pole bean might. Then you have to just leave it alone for several more weeks. The bean pods will start to turn brown. The casings will grow dry, brittle, and thin. This area of your garden will start to look very, very ugly, and you may be tempted to pick them too soon. But after a short while longer, the individual beans inside each pod swell and then harden. You know it's time to harvest your beans when the casings are crackly between your fingers and you can feel the beans separated and wiggling around inside.

To shell the beans, I recommend pulling the entire bean plants, laying them out on a flat surface (like our driveway), and then picking apart individual pods. It's much easier this way than trying to pull individual pods, and then shelling, and then going back to pull the remaining plants. This method also makes it easier to be sure you don't leave any beans behind.

As we sit in a circle shelling beans, my children take turns hopping on my lap to cuddle, squealing in delight as they pop open their pods, giggling when a slippery bean gets away from them, and admiring their harvest. In this quiet moment, they discuss the fun we've had so far this summer, what's growing in our garden, and hopes for the coming week. There is a certain peace and simplicity in this tiny gathering, where our hands are busy and our hearts and minds are open.

Time seems to stop for a short while, and in that breath I can appreciate my children for who they are and for the people they are becoming. I make a conscious effort to burn this memory into my mind, so that when they are older, and when I am older, I can remember the way they were... once upon a time.

My family works together to complete an earthy task, and I recognize that this kind of social interaction (whether it be sitting in a circle shelling beans, or peas, or peeling potatoes) has almost been completely lost in modern societies. I can see why. After all, it took us months to grow and a half hour to shell as many beans as you could purchase for $2.00 at your local market. But that really wasn't the point to begin with, so I don't mind the time/effort discrepancy. Neither do my children, who were positive that these were the most beautiful beans they ever beheld.

Even the parched and empty pods emit a certain beauty... before they get dumped into the compost pile along with the rest of the spent bean plants.

Finished bean plants are excellent brown additions to your compost pile.

If you happen to have some beans in your garden you plan to shell, I just want to leave you with one other tidbit of advice that I learned the hard way last season. Even if your shelled beans seem tough and dry, it's important to leave them out in a warm place to allow them to finish curing before you store them in a sealed container. If the bean seeds have any moisture left in them before they go into storage, they can get moldy, which would truly be a tragedy!

There are so many beautiful varieties of dry beans you can grow these days. Seed catalogues abound with brown, pink, black, red, and even multi-colored beans. For online seed catalogues, click here or here. Plant some in your garden next spring and you, too, might just find yourself splayed on your driveway with loved ones near, shelling simplicity.

Thursday, August 25, 2011

Kooky Cukes

Usually I grow vegetables... and sometimes we have fresh fruit in season at PSF.

This year, however, I grew weapons of self-defense. At least, that's what my neighbor exclaimed the other evening as she passed by and spied me harvesting a basketful of cucumbers.

I happened to have a Japanese cucumber slung over my shoulder like a baseball bat--and to say that the Japanese cucumber was the size of a bat was not much of an exaggeration. This year I harvested some that were almost 24 inches long! Japanese cukes are massive and the vines are prolific producers; I would only recommend growing them if you [and your family and your neighbors] are serious cucumber lovers. My family is getting tired of them. My neighbors have had their fill. And they're still coming strong. We've even starting feeding cukes to the chickens, who seem to be getting bored with them as well!

Can you guess which one is the Japanese cucumber?
I probably could thwart an attacker with this thing if provoked!

The next type of cuke I grew this year was the lemon cucumber. I'm sure you can guess which one that is! These were definitely a novelty. Every time I took some to a dinner party to share, people picked them up thinking they actually were lemons. Despite being eye-popping on the vine (and a conversation starter), I have to admit that they were a little disappointing when it came time to eat them. They are harder to peel because of their sphere-like shape, they have lots of seeds unless you pick them very small (which makes them even harder to peel), and once peeled, you can't tell the difference between them and any other cuke. I was hoping for at least a hint of a tangy flavor!

Lemon cucumbers are cute, but maybe not worth the effort.

The last cukes I grew this year were of a pickling variety. I have yet to make any pickles this summer, but it is still on my to-do list. For more on making homemade pickles, click here. I truly believe they are worth the effort, and an easy way to start canning!

Pickling cucumbers look like regular slicing cucumbers but have a thicker skin that stays crisp during the pickling process (pictured bottom right).
It's a little late in the season to start planting out cucumbers this year, but come next spring, remember that there are so many different varieties you can grow at home! They are super easy to grow, even for a beginning gardener. Stick them in a pot or a raised bed. Plant them next to a trellis and watch them soar sky high, or let them trail along the ground if you prefer. You can't really go wrong with these kooky cukes!

Saturday, July 30, 2011

Orchard Expansion!

About this time last year, I took some time to evaluate my progress at Pocket Square Farm. By the end of the summer season, it was clear to me which produce I had too much of (zucchini and cucumbers), and not enough of (fresh fruit, onions, potatoes, and garlic). Last year, we reached our sustainability goals with regards to veggies: we rarely had to purchase vegetables at the market during the winter, and never in the summer.

Fruit, however, was a different story.

My weekly grocery list always included fruit. Despite that we had already planted a lemon tree, a lime tree, boysenberries, blackberries, and four blueberry bushes, none of them had started really producing dependably. And my kids eat a lot of fruit... as they should.

My husband planted two apple and two orange trees for me for Mother's Day last year. It was the perfect gift for me, but I knew that, as far as feeding a hungry family went, it just wouldn't be enough fruit.

When we chopped down and hauled away a monstrous bougainvillea bush in our backyard this past spring, I finally saw my chance. The wall it had overtaken was a perfectly sunny yet sheltered space for a pocket-sized orchard expansion.

I sent my husband off to my favorite local nursery, where he brought home not one apple tree, but four semi-dwarf plants.

Each is a different variety, so that [hopefully] we will have different apples ripening throughout the year. The four species he purchased were Pink Lady, Dorsett, Fuji, and Gala. After creating a slightly raised bed with left-over wood from our fence addition, my husband moved the sprinkler heads forward so that the apple trees would not get wet when the sprinklers went off. (I've read that apple trees prefer to live sprinkler-free and without grass directly touching their trunks.) Before planting, we amended the soil with lots of steer manure, since the soil we were planting in was not all that great to begin with.

After the trees were planted, I pruned them according to the principles of horizontal espalier. The art form of espalier requires sacrifice and patience. I had to begin by lopping off several beautiful branches and shoots that were not positioned correctly. Based on what I've read, I can expect to wait approximately three years for the framework to be complete and the trees to really begin fruiting heavily. If you are looking to add some fruit trees to your yard, but you don't want to take up a lot of space, you can read about the art of espalier here.

Three years is a long time for my orchard expansion to come to fruition, and I hope the bounty will be worth the wait. At least we can expect a few ripe apples from Pocket Square Farm to taste-test this fall!

Thursday, July 28, 2011

The Corn is as High as an Elephant's Eye...

... An' it looks like its climbin' clear up to the sky.

That is to say, if you read my post about corn last year, I'm happy to report that this year's plantings did considerably better! In case you've struggled with corn, yourself, I wanted to share some tips I've learned along the way.

Tip #1: Plant your corn seeds very closely together. This year I planted them about 6 inches apart, in blocks, to ensure better pollination. It seemed to work, as I had many more developed kernels in each ear. The silks, down here...

... need to be pollinated by the tassels, up here.

Tip #2: Plant your corn blocks in an area that gets a gentle breeze. This also helps the corn silks to be pollinated.

Tip #3: Corn is a heavy feeder of nitrogen. Make sure your corn stalks get the nutrition they need by inter-planting with beans, which produce nitrogen in their roots and, in turn, feed your corn. This year I planted one bean seed in the same hole as each corn seed at the same time. Next year, I think I'll plant the corn seed a couple of weeks ahead of the bean seed, in order to give the corn a leg up on vertical growth. After all, the beans feed the corn, but the corn needs to be tall enough to support the beans (if you choose a pole variety).

The result of interplanting beans and corn looks something like this: a jungle of beans scrambling to the top of your corn stalks. I will admit that it made harvesting the corn and beans just a mite trickier... but the end product (at least with regards to the corn) was better quality.

Yes, in case you were wondering, corn and beans are part of Three-Sisters gardening, which I also blogged about in Corn 101. It turns out the indigenous people really were onto something!

No need to use stakes or bamboo teepees to support these pole beans... the corn stalks did all the heavy lifting for me! As an added bonus, the beanstalks [in their messy tangle of vines] actually did me another huge favor: they helped hold the heavy corn stalks upright. (Last year I had to pull a lot of immature stalks because they fell over onto my neighbor's brand-new Cadillac SUV. This year, I'm happy to report, the corn and the Caddy did not make contact!)

Tip #4: As the ears start to fill out, pull back the silks gently, occasionally, to make sure they aren't infested by corn worms. If you do find worms, they can be picked out and squashed by hand before they do any real damage. After you've sleuthed around, pull the silks back up around the tip of the cob and secure in place with a twist tie. Really! This method of pest evasion didn't seem to hinder the corn's development at all... and worms did not ruin my harvest.

Tip #5: When do you know to harvest? Wait until the silks become brown and dry... but not much longer than that. I found that the sweetest, juiciest corn was underdeveloped, rather than overdeveloped. Kernels left in the garden too long get tough and starchy rather than tender and sugary.


And my last tip: Don't overcook your corn! Once you've harvested those gorgeous ears, bring a pot of water to a rolling boil, shuck your corn, and then toss the ears in for exactly three minutes... no more! Remove from the pot and serve immediately. Don't let the corn remain in the pot, as it will continue cooking and become soggy and tasteless. Eeww.

If you live in sunny So Cal and you've been wanting to grow corn and beans, I really don't think it's too late! If we have a warm autumn, as we usually do, you may very well be able to pump out a round of short-season corn and beans. Look for varieties that mature in less than 60 days, and you might just find yourself quoting Rodgers & Hammerstein by the beginning of October, too!


Monday, June 20, 2011

Trading Up

It's been a while, but I am back to blogging.

The end of the year is always a bit of a whirlwind for teachers. Open House? Check. Report cards? Check. End of year assessments, field trips, and activities? Check. Cleaning out the classroom. Check, check, check. Now it's official: school's out; summer's in!

Call is kismet. Fate. A good omen for the months ahead. The stars were definitely aligned when I headed outdoors on the first day of summer vacation.

There, I picked my very first warm, ripe, and juicy tomatoes of the season. There's just something special, almost startling, about the eye-popping, fire-engine red of a ripe tomato against the leafy green backdrop of its foliage that screams to be picked and devoured. As I gently placed the tomatoes in my gathered apron-front, I reveled in the thought that I could eat these beauties anytime I wanted to, not just at the 10:50, 1:15, and 2:10 recess breaks. Now that's freedom! Sigh.


I've officially traded in my red checking pens for red tomatoes. Enough of growing young minds for a few months; Time to grow more veggies! If you haven't planted tomatoes yet this season, I promise it's not too late. Continue planting seedlings through the end of August in warm Southern California, and you might just have ripe tomatoes through Thanksgiving! Plant any variety in June, plant Early Girls in July, and plant Glaciers in August (they tolerate cooler temperatures later in the fall). If we have a warm autumn, you'll be seeing red practically until you start decorating for Christmas!

Happy summer to teachers everywhere! Check back soon for some mouth-watering recipes using [what else?] these tomatoes.

Wednesday, May 18, 2011

Butterfly Birthday

Today is my birthday. Yep, I'm turning 29 again.

I usually don't buy myself a birthday gift. But this year, my husband was out of town spending the weekend with his mom (also her birthday), and I was left home alone with just Camille. This meant I had some time on my hands.

And because I also just got my layoff notice rescinded at the last minute, I had some cash burning a hole in my pocket. Yeah!

So I decided to spend some of that extra time and money doing something that makes me truly happy: gardening, of course. I planned, purchased, and planted the butterfly garden I've been wanting for years. And I justified it by calling it my birthday gift to myself!

Armed with plant lists for butterfly gardens from Monarch Watch and and Las Pilitas Nursery, I took Armstrong Garden Center by storm. With the help of my new friend and Armstrong employee, Martín, I filled my truck bed full of California natives and butterfly-attracting plant species. Enough to fill a 4' x 30' raised bed I had sitting empty and lifeless.

Among the plants I included are a few different types of milkweed, butterfly bushes, shasta daisies, cosmos, and numerous other nectar flowers. I planted them fairly closely together, but with some breathing room to allow the perennials to grow in both height and width. As I set the seedlings out in the yard, awaiting planting, it was amazing to see countless butterflies flutter-by, pausing on the colorful blooms.


"They already found the flowers, Momma!" Camille exclaimed proudly.

Even more so than the butterflies, we've enjoyed the antics of the flying, fleeting hummingbirds now frequenting our yard, slipping their long and slender beaks into the nectar flowers while they hover, motionless, in mid air. One sat still long enough for me to snap a quick shot.


I have one empty raised bed left in the backyard to fill, and I'm looking forward to adding a few more milkweed plants along with coneflowers, sunflowers, and verbena. Then we'll be able to certify and register our Monarch Waystation!

My gift may have been for the butterflies, but it was a happy, happy birthday to me!

Monday, May 16, 2011

Diggin' Mother's Day

I can unabashedly admit that one of my favorite days of the year is Mother's Day. This is the one day I generally refuse to do anything even remotely productive. At the very least, I shirk my usual responsibilities, deferring instead to my [extremely capable] hubby.

Kids need to get dressed?
Your turn, honey.
Time for breakfast?
Ask Dad what he's cooking.
Can't find your missing shoe?
Oh well. Go barefoot.

I figure I'm entitled to such lackadaisical behavior 1/365th of the year. Reveling in this kind of passive protest is really just a brief anecdote to my normal, everyday rush. After all, most days I feel like I'm sprinting through life at break-neck speeds; I might as well take a measly 24 hours to halt and relish the beauty of doing... well... nothing.

It's not that I desire to be spoiled monetarily on Mother's Day... not at all. I don't ask for lavish gifts or fancy outings. Reservations at an expensive restaurant are the last thing on my mind. In fact, my formula for a perfect Mother's Day goes something like this:

(cup of coffee + a good book + comfy chair tucked in a sunny spot) - (whining kids + constant interruptions + sibling rivalry) = one happy mommy

a favorite outdoor reading locale

Now, if you can work a little gardening into this equation, my level of joy increases exponentially! And because my husband recognizes this about me, he and the children gave me the PERFECT Mother's Day gift this year: some fruitful additions to Pocket Square Farm.

My family planted two apple trees in the front yard; a fuji and a pink lady. The pink lady is already bearing fruit. We planted them very close together, and as they grow we will prune the inside branches and allow the outer branches to grow in an open basket arrangement. In the end, the two varieties of trees will take the shape of one larger tree, with the added advantage of cross pollination.

My boys used two wheel barrels full of freshly finished, homemade compost to plant these trees. The compost shone warmly in the sun, and it smelled sweet as can be. It was so rewarding NOT to have to buy plastic bags full of compost made elsewhere and shipped to Long Beach. This is what sustainability is all about: Yesterday's rotten apple peels are nourishing tomorrow's apples, all within our small urban plot.

In the back, on the same side of the yard, they planted two orange trees for me: a valencia for juicing and a navel for eating. I'm guessing it will take a few years for these to really be productive, but it will be worth the wait. In the meantime, we look forward to the bright, wafting scent of orange blossoms dancing in the breeze.

Because our blueberry patch was looking a little "underwhelmed" with only two bushes in the designated raised bed, we added two more blueberry bushes for good measure. I realize that these plants may seem to be crowded, but I generally go by a "plant as many plants as you possibly can in the space you have" mentality, so I'm really not worried. If they get too big in the future, I can just prune back the inner branches similar to the apple trees. As for now, we're enjoying handfuls of fresh blueberries once or twice a week. Our mouths are watering looking forward to homemade blueberry muffins at the height of berry season.

In the end, I got just what I wanted: some time with my family in the garden and a few undisturbed minutes to myself to enjoy life's simple pleasures. Ahhhhhhh.

But enough daydreaming.
Mother's Day is over and the kids are screaming my name--gotta run!

Thursday, March 10, 2011

All Choked Up

Awhile back (last August, in fact) I planted my first artichoke seedling.

Historically, artichokes aren't one of my favorite foods, but I've been trying to diversify my plantings (and my palate). So when my local nursery stocked vibrant green artichoke seedlings, I just had to buy one. I stuck the plant in a rear corner of a raised bed in my backyard, with no better reason for its placement than the fact that it was the only open space left. I know, that was not very scientific of me.

https://blogger.googleusercontent.com/img/b/R29vZ2xl/AVvXsEh2txmslH0wzmxk4notbb0p_sSAyyuf8jXtS1BCigto8-jUdReB7muHv8aNbkGSjhS7E0p5Tg9GPseANZA7njZG2HP7a8__S-EMI0fb66zLgxkD8rZMUr9Pjr5z3o7aBQLY3d7ZeYDdjcrY/s1600/DSC05366.JPG

The plant took root and grew, and grew, and grew some more. As months passed I realized I had a monster of sorts on my hands. Other plants withered and died away with the change of seasons, but not the artichoke.

The artichoke plant got greedier, taller, wider, darker, and just generally more massive. Furry fronds unfurled from its fuzzy center, and the larger, more languid leaves lay lazily upon the ground. First it overtook a few assorted flowers... then the herbs planted nearby... and finally the patch of savoy cabbage was smothered in an array of artichoke foliage.

https://blogger.googleusercontent.com/img/b/R29vZ2xl/AVvXsEi_fTO-Sl8HBPVteC62wHqJADMSaqq_CotXc-wXp77Ah0f5lGQMpkOw3am_6qSJYKSh5Gtzo3DMAJhYuO3GlDSqpJSr5klqWSJZrIJjICfcG3UO0rVcksgtaKV3kFjFW4VsrozoFBE_K2gY/s1600/DSC05974.JPG

Of course, there were no actual artichokes to be found.

My feelings and opinions about the artichoke plant turned from admiration and curiosity to suspicion and resentment. Did I really want to commit 16 square feet of raised bed to a single artichoke plant? I mean, in a small urban yard this thing was squatting on some valuable real estate. Would it ever produce an actual artichoke? And if so... when, and how many?

I ranted and raved to my husband in a nonsensical tirade about selfish plants that always take and never give. Tying my shoelaces in a dramatic flurry, I grabbed the biggest shovel we own and stormed out the back door, ready to do some serious damage to that good-for-nothing, free-loading, perennial fiend!

I flew through the yard, scattering chickens this way and that, as I planted the spade at the root of the great beast. Raising one foot to the top of the shovel, I gripped the handle mercilessly and prepared to dig with all my might. I bent forward and down toward the plant to ensure enough leverage when--lo and behold--a minor miracle occurred.


I found myself nose to nose with none other than our first tiny artichoke, tucked sweetly within the greenery. Surprised, I dropped the shovel, and parted the great leaves in search of more baby artichokes. I found nine altogether, and I hadn't even known they were there. Fury melted away to a feeling significantly more maternal.

In fact, I got all choked up.

So the monstrous artichoke plant has been granted clemency... for now.


Of course, we'll have to see whether my family will actually eat any of the artichokes before the beast is officially pardoned!

Wednesday, January 26, 2011

Emerson Update: Progress in Pictures

If you've visited Pocket Square Farm before, you may remember that I helped my friend, Brett, plant the Emerson Elementary Organic Garden earlier this school year. In my first blog about the school project, photos mostly portrayed large wooden raised beds filled with good soil... and not much else.

Much has changed in the Emerson garden over recent months as Brett and his students have carefully tended their patch of earth. Here is their progress in pictures.

The lime tree has been pruned way back to encourage side shoots and allow for more sunshine in the plot (front left raised bed).

View from the front sidewalk, where orange flowers frame the entry arbor.

This garden's success is due to Brett's diligence and his students' enthusiasm. I stop by occasionally to give advice.

Seeds and seedlings are planted close together to provide maximum yield.

Although we thinned the carrots tremendously, their green tops are still thick as a forest. At this moment in time, the carrots about about a finger's length and width. Brett plans to invite the kindergarteners out to share a fresh-from-the-garden snack (carrots) with his 5th graders in the near future.

Lettuce continues to be one of his top sellers at classroom farmer's markets.

Sugar snap peas have reached the top of the trellis and need to be pinched back weekly. This stops them from growing taller and, instead, encourages side growth (and more peas).

The sweet, white flowers of sugar snap peas wither away as the pea develops.

The blooms are delicately beautiful, in and of themselves.

Onions planted from sets (small bulbs) have sprung up beneath the lime tree. We expect to harvest full-grown onions over the summer months, or perhaps even in the fall.

Radishes grew to golf-ball-sized proportions, and were harvested and sold at their last farmer's market.

Cauliflower was a popular item at Emerson's last farmer's market. Each large head sold for $4.00.

Broccoli is a very profitable crop. Once the main heads are cut and sold for $3.00 each, Brett's class will be able to harvest secondary, side-springing florets, which can be bagged and sold together at a similar price.

Brussels sprouts are beginning to form marble-shaped buds at the intersections of their stalks and lateral stems.

Purple cabbage is just beginning to form heads.

Chinese cabbage has already been harvested a few times, and it continues to pump out beautiful, large, tender leaves perfect for stir-frying.

Green cabbages will be ready to harvest in time for Saint Patrick's Day!

And then, there were a few pretty surprises of the floral variety.


Johnny Jump Ups are tiny rays of sunshine on a cold winter's day.

We will continue to harvest winter vegetables, most likely, through mid-March, where after we will pull and compost the remaining stragglers that are no longer producing. Our plan is to do spring planting sometime near--surprise!--spring break, with hopes that Brett's students will get to enjoy some of that wonderful summer produce before school ends in mid-June.

Stay tuned for more fresh happenings... in the Emerson Organic Garden.